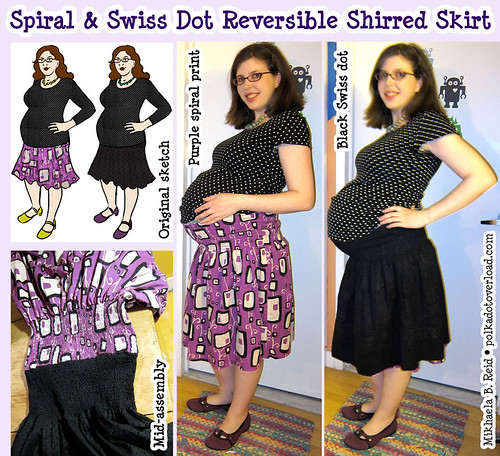
After all my trials, tribulations (and eventual triumphs) with shirring, I actually finished this skirt three weeks ago--just in time to be too exhausted to photograph it or write about it. But I have been wearing it (mostly the purple print side) and it's just what I wanted--comfortable, stretchy, cute, versatile, and totally wearable post-pregnancy too! It's shown above with the polka dot top I also sewed for the mini-wardrobe contest deadline I failed to make.
Side note: is my 36-weeks-pregnant belly a big round basketball or what? I know it looks cute, but it sure feels like a big lead weight!
Pattern Review: "Self-drafted" reversible full skirt with elastic shirred yoke. (If you can really call playing with a bunch of rectangles "drafting"!) I originally planned to modify this purchased non-reversible Burda 7910 skirt pattern, but it turned out to be a circle skirt which just didn't work with my fabric.
Inspiration: I needed 4 pieces for the mini-wardrobe contest that could combine to create at least four outfits. I decided to do 1 top, 1 (reversible) skirt, 1 dress/jumper and 1 top/cardi/jacket.
The reversible skirt was inspired by a RTW Gap skirt my mother gave me ages ago. On the fit side, it fit me just fine before pregnancy, but continues to be comfy and wearable after 40 additional pounds of bust, belly and baby.
On the versatility side, I found it great for travel. Cartoonist Husband and I traveled around the Yucatan penninsula in Mexico by bus in 2007 and last year, and around London, Amsterdam and Southwest France and Paris via train, subway, bus, ferry and car. So we were all about packing light--just one carry-on sized bag each. Reversible shirred skirts are PERFECT for that, and they don't look so bad even when wrinkled.
Shirred skirts were also popular in the 1940s and 1950s for women's and girls "play" clothes--or so I gather from the Sears catalogs of the time.
Also, I needed an excuse to buy that fabulous Maggy Lawn cotton print from Emma One Sock before it sold out.
More photos:
Note: I know the hemline here looks like it's WAY below the knee, but it's actually just below--I think it's the angle of the camera on my tripod making my legs look short.
Another side view and a front view (since I don't usually pull up my tops to show the yoke!)


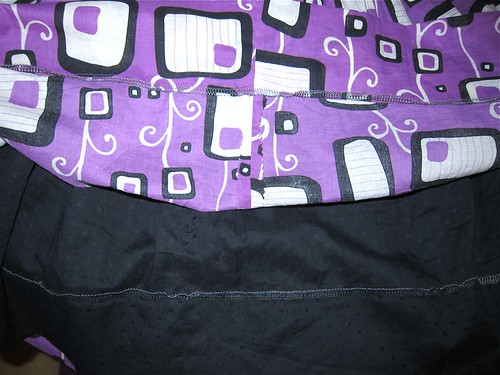
Back views: (Somehow the purple skirt seems to peek out from under the black skirt despite them being hemmed exactly the same, but I just don't care all that much)
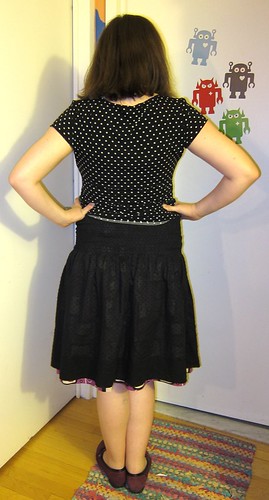
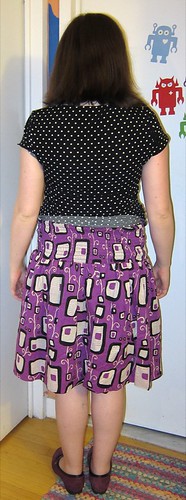
Entire review--with some explanations and in-progress photos--after the jump. I had meant to do a proper tutorial with diagrams and all that, but that will have to wait.
Pattern Description: "Self-drafted" reversible knee-length full skirt with elastic shirred yoke. It's really two separately constructed skirts seamed together at the waist to line each other.
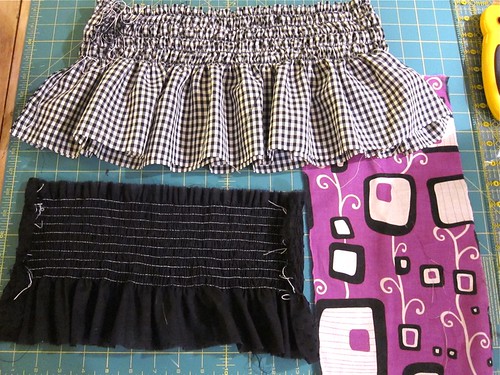
Pattern Sizing: I played around with this a lot--I wanted the yoke to be tight enough that it would contract to fit my waist post-pregnancy, but stretchy enough to be comfy around my 45"-inch waistless preggo belly. I made a test yoke in cheap gingham that was 80" around (two 40" rectangles) before shirring, and 35" around at rest once shirred... but it was SUPER loose.
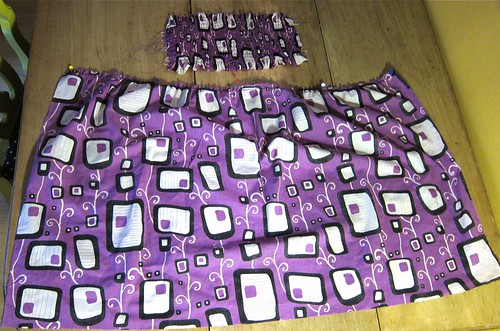
So I toyed around with pins and settled on cutting a 68" yoke (two 34" rectangles) and shirring them with pieces of 15" elastic thread so the yoke would be a bit less than 30" around at rest when shirred. Below is the original gingham test sample and a final yoke piece in the black Swiss dot:
I was originally going to just use the entire 57" width of the fabric for the full skirt part (for a total of 114" of fullness around) but I did that with my ribbing-yoked skirt and found it a bit too full. So I went with just cutting four 40" wide rectangles instead (for a total of 80" all around) and set aside the leftover bits to make a scarf at some point.
Fabric Used:
- For the print side: Lightweight and somewhat sheer purple, black & white Maggy London cotton lawn print. From Emma One Sock at $10.50/yard. I used a bit less than 2 yards.
- For the solid side: Lightweight and somewhat sheer black Swiss dot cotton lawn. From Fabric.com at $3.59/yard. Again, a bit less than 2 yards.
Approximate Cost: $23 worth of fabric + $2 worth of elastic thread + $0 for the pattern = $25.
A few in-progress photos:
Closeup of my shirring technique from the inside. This photo is actually of me sewing the two skirts together at the waist, but you can see that I just sewed a medium-width zig-zag over pieces of white elastic thread. I kept them parallel and about the same distance apart (3/8") with a quilting guide:

Getting ready to attach one of the yoke pieces to one of the skirt pieces. Before sewing them together I had to gather the width of the 40" skirt piece to the width of the yoke piece at its most stretched out (32"). I used just one row of basting (with top-stitching thread in the bobbin) to do this:
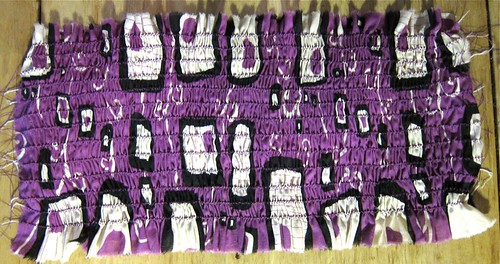
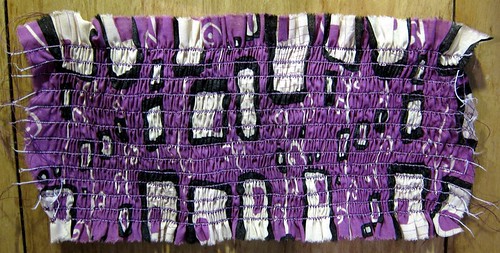
Closeups of shirred yoke piece from outside and inside:
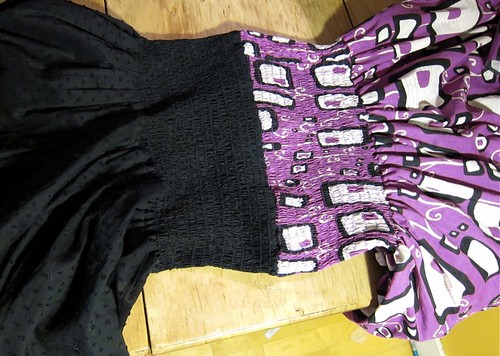
The two completed skirts attached at the waist, about to be turned inside each other:
The insides of the hems. I just pinked the side seams, but I finished the skirt bottom edges with my serger before blind-hemming them by hand:
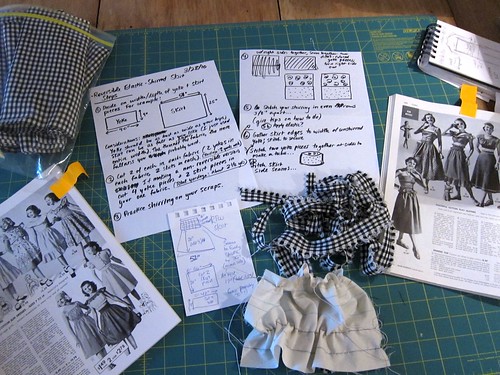
Successes: It's not exactly a drafting masterpiece (again: just a bunch of rectangles), but I am really proud of this skirt and I love wearing it. I had to figure out all the construction techniques and sewing order on my own, and it was like putting together a puzzle. Never mind all the hassle I went through figuring out how to get my machine to shir! Here were some of my notes in progress:
Room for improvement?: The purple skirt probably shouldn't peek out from under the black skirt like that. And I may have figured out how to shir, but I have not figured out why shirring is considered a quick and easy technique--I sewed over 60 rows of elastic shirring for this thing, and each one took maybe three minutes... a very BORING and TEDIOUS three minutes.
Would you sew it again? Would you recommend it to others? I may sew more shirred skirts, but perhaps non-reversible ones with shallower yokes, to save me some serious shirring time. And I only recommend this skirt to others if you are a shirring speed demon or don't mind sewing row after mind-numbing straight row.
Conclusion: Two mini-wardrobe pieces down... two to go! Except the contest is way over. Whatever. I love this skirt.

This looks terrific!
ReplyDeleteDon't feel bad, I still have one mini-wardrobe item to finish, so 3-down, 1-to go. I would LOVE to do it this weekend so it would at least be done in the same month, but...
ReplyDeleteThis is such a cute skirt! I love your basketball belly, too!
ReplyDeleteSweet! It looks great on you - basketball and all.
ReplyDeleteYou look gorgeous, and I admire taht shirring. Wow!
ReplyDeleteSo cute! It looks very comfy, I'm a bit jealous. And your bump is adorable.
ReplyDeleteAw, thanks everyone! I am just counting the minutes... and watching said basketball belly jump (or more accurately, roll like waves on the ocean).
ReplyDeleteNice job! Having recently shopped for maternity skirts, I know that a good one is hard to find. Good for you for making your own and making it postpartum-friendly, too!
ReplyDeleteI think you look absolutely adorable. Your basketball belly is very cute and the packaging aka reversible skirt is lovely. I like the fact that you can wear it post pregnancy as well.
ReplyDeleteLOVE the skirt, and you look so ADORABLE!
ReplyDeleteAlso, I just noticed the robots in the background. They made my day.
ReplyDeleteI love that it's exactly like your illustrations! It looks great and so comfortable.
ReplyDelete