Few things are as terrifying for a knitter of delicate constitution as approaching a painstakingly handknit sweater with a sewing machine and a sharp pair of scissors. That delicate garment into which you've poured your knitting heart and soul—building it gently stitch by stitch over weeks, months, maybe years—could all unravel in a matter of moments if you muck it up.
Many knitters would rather frog the entire thing themselves and reknit it at a smaller size.
I am not one of those knitters.
Instead, I am here to tell you that Baggy Sweater Repair Surgery (BSRS) CAN be done—and to encourage you to make an attempt at refashioning before tossing your too-big knit (or using it for a car cozy).
DISCLAIMER: Polka Dot Overload is not in any way responsible for any sweater runs, tears, ravels or other yarn injuries, minor or major, that may result from the application of scissors or sewing machines to handknit garments.
Yes, I came. I saw. I altered a hand-knit sweater... by MACHINE (I'm serious, you can do that—Eunny Jang says so!). And here's how I did it:
Supplies & equipment used:
- Unwearably baggy hand-knit sweater.
- Sewing machine with zig-zag stitch function
- Ballpoint needles for machine sewing
- Thread to match sweater color
- Thread in a contrast color for basting
- Darning needle for hand basting
- Sharp shears (I use these)
- Pins
Step 1: Assess the Magnitude of the Problem. This is a somewhat risky surgical procedure, so I wouldn't necessarily advise performing it on a frequently worn sweater that is ALMOST perfect. It's probably best reserved for the most critical of unworn sweater cases.
Now I originally knit my Flutter Sleeve Cardigan to the correct gauge in a size 36" bust (that's 2.5" of negative ease). However, because the yarn was a cotton-silk blend, it bagged and stretched over time, so it was even a bit too big back when I was pregnant:
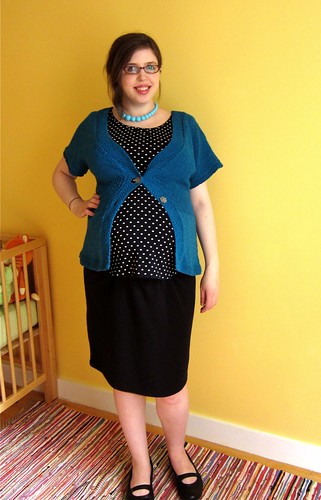
Which means I haven't worn it in THREE YEARS. An ideal candidate! (Plus I needed it for Me-Made-May.)
Step 2: Pin Out the Excess Ease. I tried my sweater on, and determined that the biggest issue was in the length over the bust—it had stretched out there by about five inches. I put the sweater on inside out, and carefully pinned out the excess ease over my shoulders while looking in the mirror:
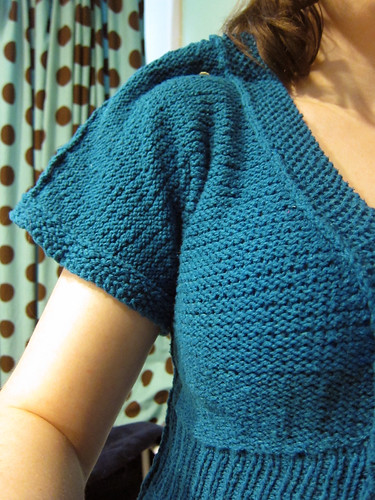
I determined that I needed to take out about 5" total of length (seriously!) vertically, about 3" from the front shoulder and 2" from the back. I tapered this out to 0" at the end of my sleeves.
Note that some baggy, stretched-out sweaters may also warrant taking in at the sides (at the side seams if they exist, or by creating side seams if they don't). And baggy sweaters with set-in sleeves might even require removing the sleeves and sewing them back on—but be sure to secure with a few careful rounds of zig-zagging near any areas you plan to cut (zig-zag set to 0.5 mm width, 1.5 - 2 mm length).
Step 3: Even Out Your Alterations. I laid my sweater down flat and carefully adjusted the pins on each side for symmetry:
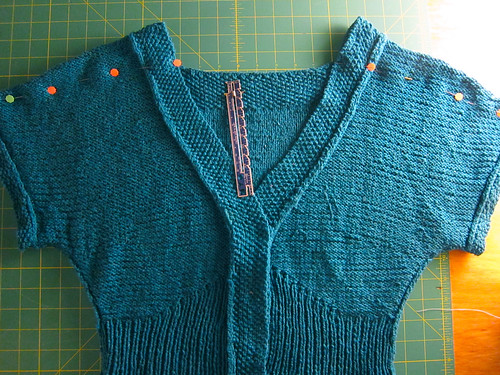
Step 4: Baste and Check Fit. There's really no going back once you sew into a handknit with a machine, so I wanted to make sure I was doing it right. Using white thread for contrast and a darning needle, I sewed a loose running stitch along the pin line, removed the pins and tried the sweater on again to be sure it fit (which it did!) At this point I also used my darning needle to close up the button holes quite a bit—they had stretched out so much the buttons were just falling out.
Step 5. Take a Deep Breath and Machine Sew it. VERY CAREFULLY. I sat down at my machine and very cautiously sewed a line of zig-zagging (0.5 mm zig-zag, with a 1.5 — 2 mm stitch length as recommended for sweater knits in my trusty copy of Sew Any Fabric) right next to my line of hand-basting stitches. Then I sewed a second line just for extra security. I made sure my stitches were well fixed at each edge, because even one unzig-zagged knit stitch could start a dropped stitch unraveling chain reaction of DOOM.
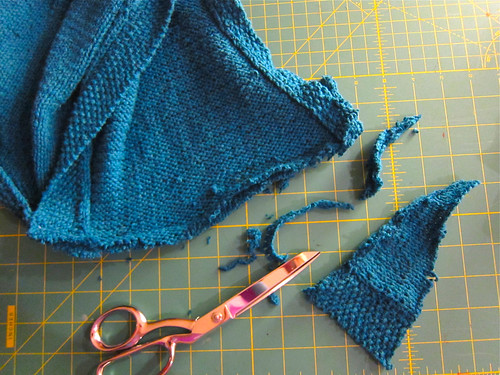
Step 6. Take an even DEEPER Breath and Cut Away the Excess. This part was hard. I kept checking and rechecking to make sure I wasn't cutting too close to the new seamline... EEEK:
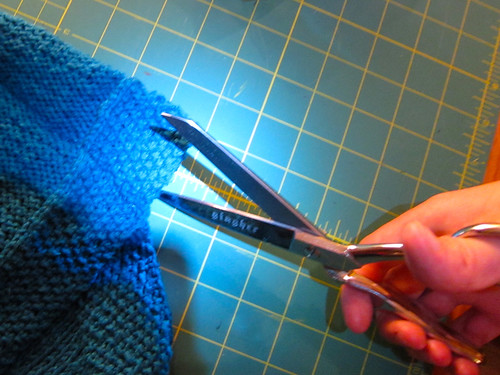
And then moments later, it was all over:
I'm happy to report the sweater patient is recovering well and is quite wearable now, though still a bit less snug than I prefer. (And I'm still recovering quite well from my own actual surgery, as you can probably guess from the steep increase in activity on this blog).

I told you I was a RECKLESS sewist!
So tell me: would you ever sew and cut up a handknit — or would you rather reknit it from scratch?


You are brave! I'd be happy to try this on a thrifted item of knitwear but it's much scarier on a hand knit. That being said, if it's not wearable in its current state then what have you got to lose? Good for you for taking the plunge, it was worth it!
ReplyDeleteI've done this in the past to take in the side seams. It is super scary but it really works very well. The key,as you say, is to be confident that your alteration is correct before your sew/cut, and to ensure that you have sewn a very, very secure seam before taking the scissors to the garment.
ReplyDeleteBrava! I knit his *exact* sweater last summer and donated it to Goodwill because it was HUGE. I'd much rather cut and sew a handknit than frog-and-reknit. Thanks for the great "lesson!"
ReplyDeletethis exact sweater. Duh.
DeleteI'm not a knitter, but that was an entertaining post!
ReplyDeleteYou are brave! I'm scared even to cut up RTW sweaters!
ReplyDeleteI have cut and resewn RTW sweaters, but never my handknits. I'm too perfectionist--I start thinking about how I hand-formed every one of those stitches and I can't bear the thought of cutting. I actually did frog and re-knit an entire sweater last year. My current project is stalled because frogging looms--but just the last few inches, not the whole thing!
ReplyDelete